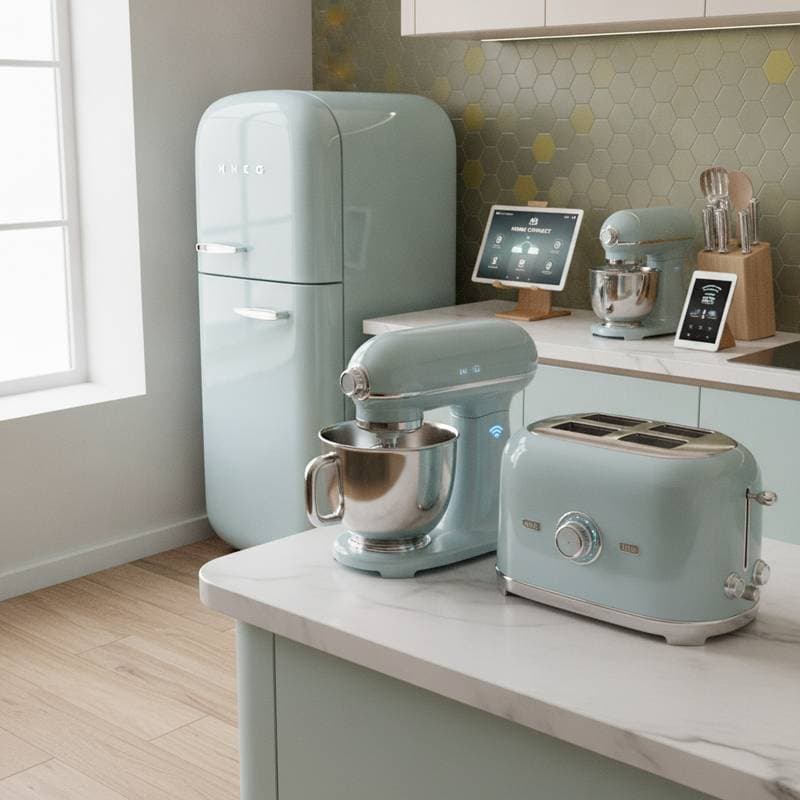
6016f84436cfb2ecd6d4366e6fe2b3ba.jpg

How to Refinish Hardwood Floors With Wax

Hardwood floors are exposed to tear and wear from foot traffic through the last few years and require some form of protective coating to help the color and wood stay in good shape. While chemical sealers are generally more common, there are organic alternatives like wax which offer the same level of safety. When the time comes to refinish your hardwood flooring, look at a wax finish instead of a compound sealer for a greater level of sustainability.

Removal of Old Finishes

The very first step to refinishing a floor is that the removal of the old end. When working against a compound finish, like polyurethane, a large disc sander is the best option to sand off the top layer of finish. An 80 to 100 grit pad does the trick. If the floor has an existing wax finish, there are a number of chemical agents available to help strip the wax from the top of the surface. You do not need a sander to remove an existing wax finish. Instead, follow manufacturer guidelines for removal and application, which usually involve a mop, rags and some elbow grease.

To Stain or Not to Stain

Once the original finish was taken away, you have a choice: to restain the floor as-is, or to sand it back to the original wood color and restain in another color. This doesn’t have anything to do with the structural integrity of the floor. Rather, this is purely a visual component that’s based on individual preference. If the ground cutting is in good shape and has just faded slightly through the years, look at applying a new coat of stain to bring new life to the floor. Otherwise, sanding it back to the wood beneath the stain layer is the sole option to change the color.

Floor Preparation

If you choose to refinish the floor in a very different color, the flooring has to be sanded. The first 80 to 100 grit pad used to sand off the top coat of compound finish also functions to remove the upper layer of stain from wood. Once you arrive at the color of the wood beneath, the flooring has to be polished to prep it for a new stain. Progressively finer grits of sandpaper achieve the smoothed surface you desire. Typically, just a couple of additional moves with finer grits on the sanding frame are needed, but if you would like a greater shine to your flooring, smooth it down with additional. These finer grits do not remove much of the wood surface, they only smooth and polish instead of sanding down through. After finished, use your stain as desired to get the look you desire.

Wax Application

Wax application is a multistep process, as one layer of wax doesn’t supply a decent coating for the floor. Manufacturer guidelines vary for particular application procedures, but the rule of thumb is that you use the wax in thin layers, which harden as the wax dries. For optimum results, use back and forth strokes at an angle to the joints of the hardwood planking. This better suits the joints between the wood with wax, which also helps dampen sounds sometimes caused by walking creaking planks. When you are finished, look at putting a buffing pad on the sander and buffing the floor to achieve a greater level of wax and wax.

See related

b9d6e73d20398c61cbd341b2f8707e84.jpg

Yard Tools for Gardenias

Caring for gardenias (Gardenia spp.) Requires special yard tools for successful growth. When cared for properly, gardenias reach heights up to 6 feet with an equal spread. Gardenia shrubs develop best in U.S. Department of Agriculture plant hardiness zones 8 through 11 in light to partial shade. Plant gardenias in well-drained dirt and water frequently.

PH Soil Test

Gardenias need acidic soil, ranging between 5.0 and 6.0 on the pH scale. Perform a pH test on your own soil before buying gardenias because lowering pH soil amounts may take as much as a year, based on the method you use. Spread elemental sulfur at least 6 inches deep into the soil at a speed of 1 1/2 lbs per 100 square feet to lower the pH level by 1.0. Perform another pH soil test three to four months after the first application and apply more, if necessary. Iron sulfur reacts with the soil three to four weeks following application and takes 12 1/2 lbs per 100 square feet to reduce the pH level by 1.0. Do not apply iron sulfur in one application if you need more than 9 lbs per 100 square feet. Split the software to avoid reaching high levels of soluble salts.

Planting Tools

The ideal time to plant gardenias is at the spring or fall. You will need a scoop to dig the planting hole and nourishment after planting. Assess the root ball and use the scoop to dig the planting hole two to three times wider than your measurements. Dig the hole only as deep as the root ball and fill it halfway with soil. Water the planting hole and completely fill the hole with dirt once the water has drained. Acid-loving plants need fertilizer in the time of planting and again in June. Fertilizers may cause damage if implemented in fall because they stimulate growth and expose the plant during winter weather. Gardenias need regular watering. Spread mulch over the planting site helps keep moisture in the soil.

Pruning Tools

Gardenias need pruning once the flowering season is over so that you avoid pruning away creating buds. Pruning controls the dimension, shape and proportions of this plant in regard to your own landscape. Measure the branches of this gardenia plant and use hand pruning shears if the divisions are less than 1/2 inch diameter. Use lopping shears for divisions between 1/2 and one inch in diameter and pruning saws for bigger branches. Remove straggly, diseased or dead branches and faded flowers to promote wholesome growth. If your gardenia bush needs heavy pruning, prune the tree in the spring before leakage starts. Prune gardenias immediately after a storm if they have been hurt and avoid after summer pruning to maintain the gardenia safe from regrowth during the winter.

Propagation Tools

Propagating gardenias from stem cutting creates new plants more quickly than starting them from seed. Gardenia bushes may take up to three years to create blooms if you plant from seed, but less than one year when you grow them from stem cuttings. Budding knives remove buds and stems used for propagating. Cut a 4- to 6-inch piece of wood that’s between six and eight weeks old. Remove all the leaves in the timber except for two to three clusters. Dip the stems in a rooting hormone and also store them in a moist rooting medium, such as equal parts of peat moss and perlite, until roots develop. Rooting hormone encourages root growth in gardenia cuttings. Wrap the cuttings using plastic bags to keep them from drying out and transplant them into planters once roots have already attained 1 inch long, usually after three to fourteen days.

See related

04501b02457864e018014707f2b2940b.jpg

What Flowers Are Best for a Flower Box?

A window box not only decorates the exterior of a home, it changes the prognosis from indoors, softening cityscapes and establishing a connection from the built environment to the growing one. A window box about the inside of a window may also provide purpose for a gardener that, because of age or disability, can not get into the garden anymore. Consider the location and ecological requirements of the own window box when selecting flowers to fill it.

Flower Box Facts

Plants in window boxes, like those in almost any container garden, are subject to more dryness and heat compared to plants at the garden. Rather than using mature plants that have grown up and therefore adapted to existence in the greenhouse or on a sheltered sale bench, purchase nursery packs of young plants that will adapt right for their window box and endure less transplant shock. Plants such as fuschia and impatiens (Impatiens wallerana) benefit in the shady exposure and daily watering to maintain their soil moist and cool. Others, such as creeping zinnia (Sanvitalia procumbens), French marigold (Tagetes patula) and petunias thrive in spite of the dryness and heat of a sunny window ledge.

Perennials

Although planting a tree or even deep-rooted tree at a window box might necessitate more dirt than a box or its settings could safely hold, there are lots of smaller perennials that could grow comfortably in a window box. Miniature roses or dwarf varieties such as the compact little variegated weigela, “My Monet” (Weigelia florida “My Monet”), can supply anchors for backyard boxes. Plants grown as annuals in other areas, such as geraniums (Pelagonium spp.) Are really tender perennials at U.S. Department of Agriculture plant hardiness zones 8 through 10 and could be grown as perennials, provided they are given protection against frost and, as with other perennials, are pruned to maintain the plants compact. Dwarf asters (Eurybia mirabilis) blossom in late summer through fall and petunia milliflora are short perennials above zone 7.

Annuals

Annual flowers are a good selection for window boxes because they blossom continually through the season — and they’re readily available in nursery packs across the spring. Moss rose (Portulaca grandiflora) and verbena (Verbena x hybrida) blossom in a huge array of colors. Creeping zinnia (Sanvitalia procumbens), trailing lantana (Lantana montevidensis) and ivy-leafed geranium (Pelargonium peltatum) trail above the edges of sunny window poles. Pansies (Viola x wittrockiana) fill in shady window boxes filled with large tuberous begonias (Begonia x tuberhybrida) or impatiens. Dwarf zinnias and marigolds will bloom throughout the season.

Other Choices

Some plants developed primarily for leaf also produce blooms; coleus (Solenostemon scutellarioides), as an example, sets up spikes of tiny blue flowers. Most herbs produce blooms — combine them in a fresh kitchen garden window box. Rosemary (Rosemarinus officianalis), mints (Mentha spicata hybrids) and catmint (Nepeta X faassenii) all produce blue to blue-lavender flowers. Ornamental oregano (Origanum laevigatum) along with silver thyme (Thymus vulgaris) sport purple to purple blossoms. Chamomile (Chamaemelum nobile) creates little white daisy-like flowers

See related

3ce287543506b3c39fc2bbab4e74ac2a.jpg

Why Burning Yard Waste Is Bad

Burning yard waste such as leaves, grass and twigs is a bad idea for a lot of reasons, as the smoke poses a danger to human health and the environment, and frequently results in dangerous wildfires. Although a lot of municipalities allow burning in certain circumstances, others ban burning of yard waste entirely. Composting is a better option, as it returns helpful nutrients into the ground.

Air Pollution

Burning yard waste discharges numerous damaging chemicals that affect human health, including carbon monoxide, dioxins, ozone-forming substances, sulfur oxide and particulate matter. Meanwhile, the Washington State Department of Ecology notes which smoke from burning yard waste could be just as harmful as cigarette smoke. Even more substances are released when burning yard waste is moist, as the waste burns gradually. Some people today experience asthma attacks or other respiratory issues as a consequence of exposure to the smoke, which can be particularly damaging to the elderly, the young, and people with conditions such as emphysema or bronchitis. Sometimes, toxins stay in the body for several decades.

Soil and Water Pollution

Smoke rises and rain cleanses the atmosphere, washing pipe particles across the ground where they’re eventually filtered through the soil and to the water supply. The water enters lakes, rivers and wetlands, where it generates an unhealthy habitat for fish and other aquatic life. Hydrocarbons and other allergens often boost the development of green algae, which chokes out other marine life. In regions with porous soil, polluted water may affect the drinking water and the food supply.

Wildfire Danger

Burning yard waste creates a risk of dangerous home and forest fires, as lawn fires escape control quickly and therefore are difficult to contain, particularly on a breezy day. Fire danger is increased throughout late spring, even when dead, dry foliage remains on the ground from winter, and in summer when grass and weeds are dry and fragile. The cost of suppressing uncontrolled flames is high for local government, fire districts and homeowners.

Alternatives

Composting is an effective, environmentally safe method to recycle yard waste, and the compost is used to enhance lawns, vegetable gardens and flower beds, or it’s implemented as a mulch around trees and shrubs. Generally, compost is composed of not just yard waste, but kitchen waste such as egg shells, coffee grounds and vegetable peelings. Many communities provide composting applications, including handy curbside collection bins or drop-off applications. Yard waste such as leaves and twigs can be chopped up with a lawnmower and used as mulch on yard or around trees and shrubs. For larger branches, chippers are available for lease.

See related

00f2d0b90893b6d84612a4a5b41c5969.jpg

Grubs and Yard Voles

Grubs and lawn voles are just two annoying insects that could lead to varying degrees of harm to your plants, lawn and garden. In addition to plant damage, voles can take lice, ticks and fleas and infest your yard using these parasitic arthropods. Fortunately, many control options are available that dispose of nuisances and stop them from returning.

Grubs

Grub is a general term referring to the larval stage of various insects such as beetles. Depending on the species, grubs reside in the ground or above ground. As an example, the grubs living in the soil might be the larvae of masked chafers or might beetles while above-ground grubs could be leaf-eating caterpillars or borer larvae. Soil grubs have a tendency to feed on the roots of plants and turfgrass and above-ground grubs consume leaves, buds and wood pulp.

Controlling Grubs

Options available for controlling grubs include pesticides, predatory insects and manual management. Pesticides with diazinon, imidacloprid or sevin because of their active ingredient control grubs in yards while the bacterium insecticide Bacillus thuringiensis eliminates the grubs of various insects above ground. Soil aerating sandals can help control grubs under ground by impaling the larvae using the spikes on the base of the sandal. Predatory insects are another option for controlling grubs both above and under ground. The Heterorhabditis and Steinernema species of beneficial nematodes feed on the grubs infesting lawns while woodpeckers absorb the grubs of wood borer insects.

Voles

Voles are occasionally confused with house mice. But voles have smaller ears, a curved head, curved snout and a tail shorter than house mice. Voles have a dark brown coat using grayish colored fur on their belly. They feed on various species of plants, munching on leafy vegetation, fruits, roots and stems. A tell-tale sign that voles reside in your lawn or garden is brownish feces that look like rice and grass clumps surrounded by grass clippings.

Controlling Voles

Common mousetraps can help control voles both inside and outside your house. Bait the trap by placing peanut butter under the pressure activate to avoid the vole from invading the lure without setting the trap off. You must put the baited trap in a right angle in the vole’s tunnel or runway. This control method requires consistently examining the traps once per day and removing any dead voles or re-baiting as required. To keep voles away, practice appropriate cultural control by removing high grass and weeds near your lawn where rodents can conceal and generate a habitat. Several commercial products designed to repel rodents such as voles are available at department stores and garden centres. These products contain thiram has the active ingredient and each manufacturer has its own instructions you have to follow for optimal results.

See related

dcddc92b5a8c8d262ab0532f2afcfce3.jpg

How to Cut a Shallow Channel Into a Concrete Floor

A concrete floor is designed to be sturdy and powerful, and take a great deal of abuse. When these advantages make it good for a garage, basement or subfloor, creating major remodeling changes, such as installing a new bathroom on a concrete floor, could be challenging. If you need to cut a shallow station into a concrete floor to accommodate plumbing, electrical or another purpose, the fastest and simplest way is having a diamond-blade moist concrete/asphalt saw, which you may rent from many tool rental centers.

Find the area of the concrete floor at which you want to lower the station. Check to be sure there are no electrical or plumbing lines running beneath the desired station. Measure with a tape measure and make pencil marks signifying each end of the station, then snap chalk lines to mark the perimeter to be cut.

Don safety glasses, hearing protection and steel-toed boots for protection. Connect one end of a garden hose into a hose bib, then connect the other end to the inlet on a concrete saw. Turn on the hose to initiate the flow of water.

Position the saw over the end of the station, perpendicular to the length of the station. Turn on the saw’s cutoff switch, choke the motor and pull on the starter cord. When the engine fires, switch the cum off and allow the motor to warm up for approximately 30 seconds.

Expand the thickness handle to lessen the blade down to the desired depth of cut. Alleviate the saw forward until the close of the station is cut.

Raise the blade and then reposition the saw at the end of one of the two chalk lines denoting the edge of the station. Alleviate the saw’s blade into the concrete and gradually push the saw forward until the first edge of the station is cut. Raise the blade, pull the back to the end of the station, and cut on the second edge as you did the first.

Slide the horizontal edge of a 5-foot metal pry bar under the end of the station and sloping up to loosen the station of cut concrete, then pull out the loosened segment.

See related

73527aa66b3f6c83f3ce1a26028b6f96.jpg

Tips for Building a Large Pond

Designing a massive garden pond is a never to be taken lightly. The pond becomes a permanent fixture in your lawn that needs routine maintenance and the bigger the pond, the more maintenance it needs. All these water features can become the focus of your backyard oasis, with tranquil koi and peaceful plants adding to the ambiance.

Planning

The preparation phase is the most significant part building a pond. Decide on the size you want, then decide where you wish to place it. A massive backyard pond is usually considered one that retains 1,500 to 3,000 gallons of water, and also an extra-large one holds more than 3,000 gallons. As an example, a 10- by 10-foot pond that is 24 inches deep holds approximately 1,500 gallons of water. Call 811 to ask your regional utilities to include mark underground wires and pipes, then use spray paint to define your preferred pond area where it won’t interfere with ports.

Filtration

Like a swimming pool, ponds need skimmers and filtration systems to keep the water clean. Make sure that the filtration system you select is designed to function with the amount of gallons you quote are on your pond. Locate a fast quote by multiplying the length by the width, then multiply that by the average depth of the pond. Multiply that amount by 7.5 to discover the estimated number of gallons the pond will hold. Look for systems that will help filter out algae and little debris in addition to ones that catch larger debris, like leaves, in a holding tank. It’s simplest to install the necessary plumbing and electrical pieces while you’re digging your pond, so plan for filtration from the beginning.

Algae Control

From the beginning of the job, plan the edges of the pool so they are raised above ground level to reduce rainwater runoff, which attracts excess debris with it. This can be as easy as placing pavers around the border of this pond to prevent runoff. A proper filtration system helps regulate a buildup of debris that can result in algae, but there are different techniques to keep the algae out of your pond. Natural methods include wrapping barley straw in a web and weighting it down in the deepest part of your pond. As it decomposes, it releases algae-inhibiting enzymes. Growing the right plants can also assist, as some, like anacharis (Elodea canadensis), consume the nutrients algae must grow. Waterlilies (Nymphaea odorata) also help by blocking sunlight algae needs from reaching the water. You can also pick chemical methods, buying liquid mixtures of bacteria and enzymes, but read the labels carefully to be sure they wo not harm your fish or plants.

Fish and Plants

If you are intending to add fish for your pond, go for a thickness between 24 and 36 inches to be certain the water is heavy enough to sustain the fish but not deep enough to stay cold on the base. Check your pond lining material to ensure it is rated as safe for aquatic life — most PVC liners are not fish-friendly, however linings like butyl rubber typically are. Insert dechlorinating agents several times before you place fish in the pond, then add more if add more water from your garden hose. Plants provide the fish areas to conceal and things to nibble on, but they don’t serve as your fish’s main food source — you still have to feed them. It’s best to place plants in pots around the bottom of your pond instead of filling the pond with dirt, which can murk your water. The pots enable you to control plants that overgrow fast, like the waterlilies, and swap them out seasonally in the event that you would like. But fish have a tendency to burrow into the soil in the pots, so cover the soil with gravel to keep out the fish.

See related

5842f05de903b9ec53523756b425852e.jpg

DIY High Tunnel Greenhouse

The high tunnel greenhouse, also known as the hoop house, is a rather recent invention. In the early 1950s, Dr. Emery Myers Emmert built the very first plastic-covered high tunnel greenhouse at the University of Kentucky. Today it is one of the most popular types of greenhouse. Among the reasons for this popularity is that the ease of construction. A do-it-yourselfer with basic construction skills can build one in a weekend.

Structure

The structure of a high tunnel greenhouse is straightforward. It consists of a series of bowed ribs over which is stretched transparent vinyl. The ribs form an arch, making the roof of the greenhouse rounded like a Quonset hut. The ends of the greenhouse are typically framed in using wood. Since the ends are straight and sturdier than the walls, the door along with any fans or ventilation equipment have been mounted at the ends. The plastic is usually tacked at the base of the greenhouse to your baseboard.

Materials

You can make the ribs of the greenhouse from just about any bendable substance. The most frequent materials are PVC pipe or even a bendable metallic pipe, like aluminum or stainless steel. Unique pipe bending machines will be able to allow you to bend stiff metallic pipe. Alternatively, you can use saplings instead of pipe to generate a rudimentary frame. Or you can utilize hog panel fencing rather of ribs. The plastic covering is normally a polyethylene film that’s UV resistant. You can make the ends of their greenhouse from any rigid material, such as polycarbonate or fiberglass.

Utilizes

The details of constructing a high tunnel greenhouse depend on how you plan use it. For growing warm-weather crops throughout the winter, you will need to set 2 layers of polyethylene film using a air gap between them. The simplest way to install the double layer is to buy especially made two-layer picture. If you intend to hang planters from the bottom of the greenhouse, then you will need to choose hardy ribbing and you will need to brace between the ribs. If you plan to use the greenhouse in a hot or humid climate throughout the summer, you will need to install ventilation fans on a minumum of one end of the greenhouse.

Advantages and Disadvantages

The benefits of a high tunnel greenhouse over several other greenhouse kinds are cost and ease of construction. The materials used to build a higher tunnel are much less costly than a classic metal-framed, acrylic or glass-covered house. Anybody with basic building skills can build a high tunnel; it doesn’t require you to cut glass or build rafters. The disadvantage is the high tunnel greenhouse is a temporary building. Polyethylene film deteriorates in a few seasons. The wooden baseboard to which the ribs are attached sits on the ground, where it has a tendency to decay. Therefore, high tunnels need considerable maintenance if you would like to keep them over a few years.

See related

7429ded840a7cdac872c72f96038846d.jpg

The way to Measure & Cut Fabric for Decorative Pillows

Decorative pillows are the jewelry of a room’s decor. They improve and encourage the plan scheme and also can introduce texture and pops of color to an otherwise dull interior. A little amount of exceptional fabric can earn a one-of-a-kind design statement, but can be a budget-breaker if custom-made by a professional sewer. But with a little bit of information and some preparation, a homeowner can create her own decorative pillows, reinforcing her own style and freeing up decorating bucks for a different purpose.

Set the pillow filler on a bit of furniture and oriented since it will be when complete. Measure and record the width since the distance from left to right and length since the measurement from the top to bottom. Measurements are listed as “width by length.” The measurements demonstrate the orientation of the pillow, indicating design management and closure placement. For example, a pillow referred to as “20 by 12” indicates that the pillow is 20 inches from side to side, plus 12 inches from top to bottom. The pattern generally runs from the very top to the bottom and a bouquet of flowers, for example, would run parallel to the 12-inch side. The closure would be set in the bottom 20-inch seam.

Assess the width of a pillow cover as from side seam to side seam, and also the length as from the top seam to the bottom seam. Normally the bottom seam homes the zipper or hook-and-loop closing. Add seam allowances and cut on the pillow fabric to the newest measurements. Seam allowances are typically 1/2 inch from home decor sewing. When inserting cording or welting to the flux, make the seam allowance exactly the same width as the width of the welt flange.

Establish one straight line and use it as the side or bottom of the pillow. Draw a line on the incorrect side of the cloth equidistant into the selvege. Use a carpenter’s square or T-square to mark 90-degree corners from this line. Measure diagonally from corner to corner within these perimeter lines and ensure that the measurements are equal.

Cut the fabric according to the design, not the grain, on a printed fabric. Cut a pattern into the required size using clear plastic or partially transparent non-woven interfacing. Center the pattern over the plan on the fabric and trace around the pattern piece. Cut on this line.

See related

afc8176450b68ced2969aec9826e45c5.jpg

Can Landlords Come Into Your Own House Without Approval?

As a tenant, you have the right to quiet enjoyment of this lease property and a fair right to privacy. Your landlord also has the right to enter the lease property for particular reasons as summarized by California Civil Code Section 1954. These laws attempt to strike a balance between landlord and tenant, giving the landlord the access she needs to this property without allowing too much intrusion or harassment. Once landlords and renters both know Civil Code Section 1954, there’s absolutely no explanation for a landlord to abuse those access rules.

In the event of Emergency

A landlord has the right to enter into a rental property without consent in the event of an emergency. A crisis is an instance where a lack of activity will cause damage to your property. Examples of an emergency include a fire, broken water heater, a gas flow or open windows at a critical rainstorm. There is not any restriction as to the time of day the landlord may enter to an emergency.

Make Repairs

A landlord should keep the rental property in habitable condition and perform maintenance jobs that happen because of wear and tear. The landlord must offer the tenant with suitable written note when he would like to enter the lease property to make repairs. The note must state when the landlord will enter the unit and why. California law says that 24 hours is considered reasonable notice. The landlord can simply schedule the entry during reasonable business hours, believed to be between 8 a.m. and 5 p.m. on weekdays. And have to leave written proof, like a note or business card, signaling that she was inside the lease property.

Permit Access to Professionals

Several repairs and maintenance jobs are beyond the abilities of a landlord, so outside professionals have to be called in. Plumbers, electricians, HVAC contractors and professionals may need access to the lease property to do jobs that keep the lease property habitable. With 24 hours written notice, a landlord can accompany the professionals to the lease unit, allow them access and stay with them since they perform their work. These appointments can only be scheduled during normal business hours and landlords have to leave written proof of entry.

Show the Unit to Potential Tenants

Landlords have the right to make sure their lease properties are continuously occupied. When a tenant gives notice to vacate, or receives a lease termination notice, the landlord begins searching for new renters. Sometimes, landlords desire to market their lease property and need to demonstrate it to prospective buyers. In any event, the landlord should notify the current tenant of when potential renters or buyers will likely be viewing the property. The landlord must accompany the guests and leave written proof that she entered. Appointments can only be set during normal business hours. In case the landlord is trying to sell the lease property, she must provide the tenant a 120-day note of intent to market.

See related