Elevate Living Rooms with Stylish Acoustic Panels
Cluttered sound can disrupt the tranquility of even the most elegant living room. Subtle noises, such as appliance hums, wall echoes, or overhead footsteps, erode the intended calm. Upon entering the space, residents deserve an instant sense of relaxation rather than distraction. Acoustic panels restore this balance by gently managing sound while introducing visual texture and warmth.
Why Sound Matters at Home
Sound profoundly influences a room's emotional tone. Excessive echo creates a cold, unsettled atmosphere, whereas controlled acoustics foster relaxation and concentration. A welcoming living room engages both sight and hearing, minimizing intrusive noises to support effortless conversations and peaceful solitude.
Acoustic panels achieve this without resembling studio gear. They capture sound reflections, diminish reverberations, and harmonize the room's auditory profile. Contemporary options feature appealing materials, forms, and hues that integrate seamlessly with interior styles.
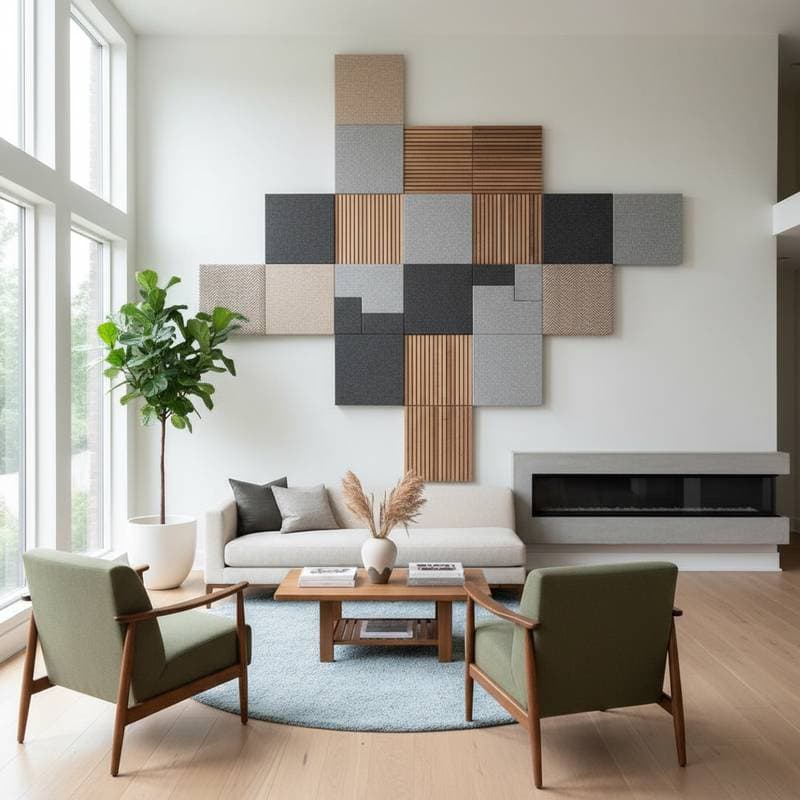
Understanding Acoustic Panels
Acoustic panels consist of sound-absorbing cores encased in fabric or other coverings. These units mount on walls or ceilings and often serve as artistic elements. View them as purposeful decor that tempers audio while enriching the room's visual narrative.
Available in materials like wood slats, felt, cork, linen, or sustainable fabrics, panels offer versatility. Designs range from abstract wall art and geometric mosaics to three-dimensional sculptures. Select options that align with your style while optimizing acoustic performance.
Choosing the Right Style for Your Room
Each living room possesses a unique character, from light and open to intimate and subdued. Acoustic panels must enhance this essence. Consider these tailored recommendations.
-
Modern Minimalist Spaces
Opt for slender rectangular panels in muted tones such as dove gray, sand beige, or cream. Position them in straight rows or understated grids to merge subtly with surroundings and refine audio clarity. -
Warm and Textured Rooms
Felt or cork variants provide organic tactility that pairs well with timber accents and fiber furnishings. This choice amplifies a nurturing ambiance in multifaceted settings. -
Artistic or Eclectic Homes
Select vibrant hues or irregular contours. Certain models function as standalone artwork, allowing personal flair alongside acoustic benefits. -
Small Apartments or Open-Concept Layouts
Use panels to delineate areas, like isolating a seating zone from a kitchen. A clustered array behind seating stabilizes visuals and curbs sound travel. -
Traditional or Classic Designs
Wood-slatted panels deliver refined warmth. Match stains or tones to cabinetry and floors for unified elegance.
Steps to Integrate Acoustic Panels Gracefully
Incorporating acoustic panels requires minimal effort when approached deliberately. Follow these steps for a seamless upgrade.
-
Observe the Sound in Your Space
Spend time listening in various positions. Note reflections from glossy surfaces like windows, stone floors, or unpainted walls, prioritizing those hotspots. -
Measure and Plan
Target specific zones rather than full coverage. Draft a layout sketch emphasizing equilibrium and proportion to avoid overwhelming the area. -
Choose Materials and Colors
Coordinate with current elements. Neutral fabric panels recede into backgrounds, whereas etched wood or motifs emerge as focal points. -
Install with Care
Leverage included hardware for straightforward setup. Renters should select hook-and-loop or temporary adhesives. Align at seated ear level, typically 3 to 5 feet from the floor, for optimal absorption. -
Add Complementary Textures
Surround panels with absorbent additions like drapery, area rugs, and plush seating to amplify acoustic gains and overall coziness.
Creating a Balanced Atmosphere
Acoustic panels shine alongside intentional design elements. Envision the living room as an interconnected system promoting serenity. These enhancements amplify their impact.
- Use Curtains Wisely: Opt for dense velvet or linen panels to dampen highs and soften sightlines.
- Add a Rug: Position a layered wool or synthetic mat beneath seating to mute impacts and reverberations.
- Include Greenery: Potted ferns or trailing ivies scatter sound waves while infusing vitality.
- Mind Furniture Placement: Arrange sofas and chairs to break direct sound paths, favoring cushioned over rigid frames.
- Keep Clutter Under Control: Streamlined surfaces reduce visual noise, allowing auditory calm to prevail.
Overcoming Common Concerns
Skeptics often fear acoustic panels appear utilitarian or cumbersome. Current iterations prioritize slim profiles and customization for discreet integration. For low-key appeal, select tone-on-tone matches that vanish into walls; for boldness, embrace textured or framed versions as decor highlights.
Budget constraints pose another hurdle. Begin modestly with panels covering 20 to 30 percent of a primary surface, assessing improvements before scaling. Installation proves simple for most, with self-adhesive backs or clip systems requiring basic tools like a level and drill. Professional help suits complex ceilings but rarely proves necessary for walls.
A Quiet Living Room as a Form of Self-Care
Balanced acoustics directly shape emotional well-being. Reduced noise lowers stress, sharpens attention, and deepens repose. Panels extend beyond echo reduction to cultivate a restorative haven.
Picture returning from demands of the day. Settling into cushions, the environment envelops in gentle hush, where dialogues flow naturally and melodies resonate fully. Such a setting nurtures bonds and solitary recharge alike.
Small Weekend Project: Sound and Style Refresh
Revitalize your living room over a weekend through structured actions.
-
Friday Evening: Prepare the installation zone by decluttering and cleaning surfaces. Assemble supplies including panels, mounting kit, and measuring tape.
-
Saturday Morning: Assess dimensions and outline placements. Aim for asymmetrical clusters or symmetric arrays that enhance room flow.
-
Saturday Afternoon: Secure panels methodically, verifying levelness at each step to ensure professional results.
-
Sunday Morning: Introduce supportive items like a fresh area rug, coordinating cushions, or ambient lighting to tie the refresh together.
-
Sunday Evening: Evaluate the transformation. Appreciate the subdued acoustics and heightened serenity now defining the space.
By weekend's end, the room emerges refreshed, equipped for tranquil nights or animated social hours minus abrasive rebounds.
Living with Your Design
Post-installation, monitor the room's evolving feel. Prioritize usability over flawlessness. Adjustments, such as repositioning items or adding panels incrementally, refine the setup to better serve routines.
Advancing Toward Auditory Harmony
Acoustic panels demonstrate how utility and aesthetics converge. They champion a holistic approach to interiors, where sensory equilibrium elevates everyday living.
This week, audit your space's soundscape. A targeted intervention promises a pivot to profound tranquility.


