what-is-in-your-winecellar-587295e70049f.jpg

What is In Your Winecellar?

I had been striving to determine the best way to arrange and decorate a small wine cellar my partner assembled in an integral part of our basement that is the the extent of a substantial cabinet after I joined Houzz, in the past in November 2008.

After investing lots of time using the pictures, I made a decision to take a course I had not noticed everywhere. I am in the method of papering the walls which don’t have ledges with amusing photos of buddies – the sort of photos that are too wild for Face Book (they are maybe not actually THAT insane – my buddies and I avoid placing anything even slightly contentious on Face Book). It seems fantastic.

I understood yesterday, however, that t had been some time since I Had perused the winecellar pictures here on Houzz, and I used to be interested to find out what was new. I am happy I did, also, since there are a few truly excellent wine cellar thoughts here:

I am unsure when the walls are glass, how humidity and temperature handle function – whether it’s it is less easy than with typically insulated partitions – but this glassed in cabinet seems excellent.

Kessick Wine Cellars

I really like the brick as well as this arch – it feels therefore large.

Greif Architects / DWELLING ARCHITECTURE

Iron work and wine cellars appear to really go hand in hand. These walls that are complex are wonderful.

I ‘ve no space in my own house for one, although a soft place for riddling stands. A big riddling stand will be an excellent addition to any bg winecellar.

For me in the winecellar, Oriental rugs only work for some purpose – they match.

JMA (Jim Murphy and Associates)

I wish I had the the room to get a lengthy tasting dining table such as this one

Jay Hargrave Architecture

I believe this chamber is really cool – I am that I really like how the room seems only a little such as the interior of the Matrix and envious of all storage.

Jay Hargrave Architecture

And I really like the way these glass partitions show off that Matrixy appear.

Design Construct Consultants Inc.

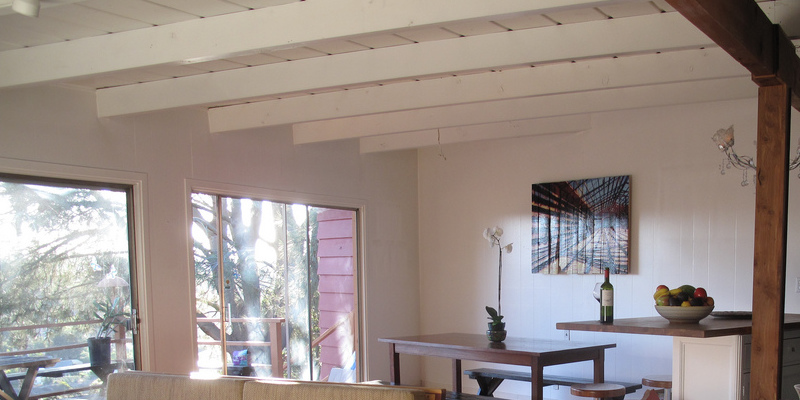
In a winecellar, the ceiling is prime decorating room (since the partitions are often covered with bottles).

InterDesign Studio

I love the way these ledges are set back in the wall, producing the semblance of space in the chamber itself.

I totally adore the thought of a vintage card catalog as wine storage device.

apexwinecellars.com

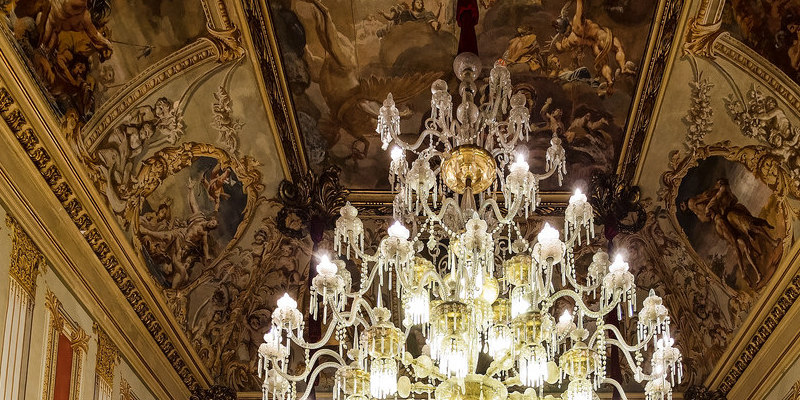
This chamber, in all it is gothic play, would be a fantastic setting for a supper party. Particularly a social gathering on Halloween.

tendencies-inspired-by-burlap-587294edbfcdb.jpg

Tendencies: Inspired by Burlap

Initially that I saw the java hammock-upholstered ottoman under, a lightbulb went off. I ‘d not noticed them used to upholster furniture while I Had noticed the bags employed as add-ons and repurposed as market totes in intelligent ways. Clearly, shorts and a burlap seat will not be a mix that is good, but that type of roughhewn, burlap appearance, bare linen is appearing around a lot recently, and that I really like it.

The burlap style is an effective solution to reuse things like aged flour and beans hammocks on ottomans, toss pillows, motivation planks, as well as around votives. The design can be accomplished by utilizing natural, bare linen for other add-on, chairs, table cloths, serviettes, as well as your curtains around your residence. It gels nicely together with the Shabby Chic resurrection that is occurring right now, utilizing repurposed or all-natural goods offers you factors that are green, it seems fantastic in A Seaside Cottage, it provides character to rooms that are diverse plus it offers that Paris fleamarket panache to your room. Let us have a look at a number of of those who’ve mastered this esthetic.

When decorating, the girl who lives in this home failed to purchase anything. She did plenty of innovative and swapping repurposing, including this java hammock upholstered-ottoman. The end result is amazing, sustainable, and creates an excellent conversation piece.

The tiniest of leftovers may have uses that are amazing – these votives seem wonderful wrapped in the textile.

Jennifer Gray Insides Design & Colour Specialist

Casually thrown bags add to that Paris fleamarket sense.

greige/Fluegge Interior Design, Inc.

The upholstery can undertake a look that is more refined.

The Lettered Cottage

Rough textured linen drapes that were organic remember the burlap material that was rougher.

That is just another excellent repurposing occupation with this inspiration board.

This striped pastoral sophistication is added by organic linen cloth.

These pillows combine nicely with the others!

Dave Lane Building Co.

Although burlap is recalled by the upholstery but is a whole lot more refined.

Ben Trogdon Architects

This wonderful tablecloth is not rougher but still h AS that aged linen appearance.

Hammock-coated pillows were designed for for the fashion that is incredibly comfortable over in A Seaside Cottage – she’s a master at highlight and mixing fascinating textures.

A Seashore Cottage

Her manager’s seat is coated in a linen that was wonderful. To see among the finest examples of applying this appearance throughout a house, take a look at her whole photoset here.

chambers-for-each-age-58471f7d81caa.jpg

Chambers for Each Age

Among the best attributes in Vogue is “searches for each age,” in which the mag shows readers the best way to interpret runway appears in a age-appropriate manner. The truth is, “age-appropriate” only might be among the best theories.

Itis a theory that functions for chambers, also. Our homes normally represent our life period – it is pretty simple to inform the dissimilarity between chamber belonging to an early 20’s current school graduate (IKEA!) and one owned by some one senior, who is had a chance to vacation and amass items.

Hereis a review of some totally age-appropriate rooms, as well as the qualities which make them thus:

Under 10 colours and simple lines make this children’s area a pleasure space. Built in ledges really are an excellent spot to put away the numerous toys that children gather, also.

This would’ve been my little girl dream space. I really like green and the vibrant pink, and the parasols are pleasure. Having a couple of tweaks, this has genuine potential to develop into a teen room that is great, also.

Dufner Heighes Inc

Teen: Two beds (perfect for sleepovers) as well as a a huge map (to plot out potential excursions) make this a fantastic area for boy and girl teenagers. It functions, also, for children that are younger.

Teen: This seat and table are ideal to get a fashion-aware teenager. Youthful and interesting, but with a few components that are classy.

20s: Decoration in your 20’s is about improvisation – that is why the reason why I adore these cartons piled as ledges. They are adaptable – simple to go, also to enlarge! – And supply much required storage, while it is for pictures in frames, outdated text books, or trendy tchotchkes.

30s – Individuals in their 30s frequently have youthful households, which indicates plenty of time in the kitchen. Open areas are perfect for families with small children – they be able to get some thing completed while maintaining a watch on the small men.

Tomar Lampert Associates

1940s – From the full time you are in your 40’s, you have possibly began to amass quite a lot of things. A vase here, a novel there – it may make to get an extremely trendy diverse house that exhibits off your style, and all accumulates.

Griffin Enright Architects

1940s – Additionally, by the time your 40’s roll about, you are prone to own a little more discretionary income than when you were in your 20’s, meaning that high-priced pieces (such as an Eames lounge chair) are eventually within achieve.

Steven Miller Style Studio, Inc.

1950s and beyond – Iwant to presume that as I grow older, my taste can be more polished. This chamber gets the form of quiet sophistication that I am expecting will exist all through my house – and within my wardrobe!

avant-garde-toilets-having-a-view-58471bca54923.jpg

Avant-Garde Toilets having a View

A favorite platitude catchphrase in HGTV planet is “deliver the outside in.” Typically, this includes some collage made from Elmer’s glue or some thing and leaves. Nevertheless, these toilet designers have taken bringing the outside into an entirely new degree.

Being fairly small myself, elevated amounts of vulnerability after I’m in the rest-room makes me really uneasy. It’s still a little bit of an exhibitionist delight to shower close to a window, or are put someplace where no one could be outdoors, although I am certain a few of these windows are possibly that unique glass where no one can see in.

Considering nature when one is au naturale is soothing. What is a much better view than the usual lovely tree Flagstaff when you are being taken by Calgon away? Below are a few lovely toilets that Peeping Toms will will like.

Dick Clark + Associates

Let there be light! Light is a lot more flattering than mild, and when is this more significant than you are strolling past a mirror in the buff?

Tracy Murdock Allied ASID

The light that is sun light here enables plants to boom.

RYAN ASSOCIATES CONTRACTORS

Glass that is blocked lets light to reveal through it without allowing pervs take a peek

INTERSTICE Architects Inc.

This window lets you gaze outside from the bath as well as the shower stall.

Along with the window, is a porthole I see on the wall that is left?

INTERSTICE Architects Inc.

The phantom seat in here is seethrough.

Sagan / Piechota Architecture

Tiles that are blue + the see = the experience of sky and sea.

David Ludwig – Architect

An excellent view in the bath.

Hughes Development, Inc

From experience overly trapped in while supplying proper privacy, frosted glass doors continue.

jump-in-great-pools-5847191009215.jpg

Jump In: Great Pools

February is here now and, when a girl’s fantasy turns to warm evenings drinks with umbrellas and, needless to say, hanging out from the pool with it, the time is –ed by resort period. Despite the fact that I won’t be jetting off to the the hawaiian islands in 2013, February is nevertheless an excellent time for fruity beverages – and for daydream about pools (summertime’s just several short months away, after all).

Here are some of the best pool dreams (pina coladas not contained, although I’m attempting to envision at least one in every picture):

Terrance J Cisco Architect, LLC

This residence, with its terraces and decks, is awesome, and I could fully picture overlooking the water. But what I truly adore is how the curve of the pool and the angles of the home contrast. Itis an instant means to make everything seem natural.

Narofsky Architecture + ways2design

This kidney fits alongside the strong cedar shade of the greatly wooded lot as well as the house. Plus – All these windows look out on a lawn for example in Salt Lake City that is stunning, do not they?

OJMR Architects

Occasionally all angles is fine, also, while I really like curve/angle comparisons. This works as the home wraps round the pool, offering a courtyard feel that is comfy enough to counteract all of the tough angles to it.

Becker Architects Limited

Who claims fantastic pools must be outside? This lap pool and jacuzzi really are an excellent add-on to your sporty inside as well as windows and the sky lights do an excellent job of bringing the exterior in. I particularly enjoy the wood ceiling – itis an ideal comparison to the concrete that is great.

First Vision Restricted

Is it possible to envision a view that is better? Water, trees, water – simply amazing and relaxing. Plus, this tremendous veranda (partly covered) is ideal for entertaining. Visualize the home strung with lanterns and small lights for a massive cocktail party or a marriage. It is like some thing from a film!

First Vision Restricted

This pool shows that tile issues. The strong blue tiles in this pool are straightforward however they add feel and wonderful depth to the water.

Pedersen Associates

I really like the way the greenery comes up to its border. A little pain for care, perhaps, but the total effect is quite and really natural.

Buttrick Wong Architects

I nevertheless adore these fountains while it is not really the Bellagio. The pool it self is lovely even – and, I am convinced, excellent to get a swim – but into a whole new degree it is elevated with the fountains.

Lori Gilder

They are actually designed to be properly used, although pools are fantastic for gazing. Roof poolhouse and this veranda make this pool that much more functional – and that-much better.

This concealed pond, coated with lily pads, is lovely and intimate as well as an ideal complement to the small dialog region on the left. Even supposing it’s not for swim, it is peaceful and ideal for personal tete a tetes or even somewhat morning yoga.

depth-guide-for-a-water-pump-599a66843e3a8.jpg

Depth Guide for a Water Pump

If your pump does not match the depth of your water well, anticipate the pump to cycle on or off or to keep on running unnecessarily, shortening its life and adding to your electricity bills. The depth of your well determines the sort of pump you need, as there are pumps that push water to the surface in deep within the well, or ones that pull water rather. When you realize the ideal sort of pump for, a pressure cylinder or a holding tank adjacent to the pump ensures continual water delivery when needed.

Sizing the Pump

Before you can size the pump to the well, you need to know the well’s depth, its stationary water level — the measurement in the ground Salt Lake City to the surface of the water — along with its retrieval rate. After the contractor drilled the well, he noted these details to your well license; the paperwork that he provides you should also have this info on it so that you can choose a pump that matches your well’s depth and output. Each well produces water at different rates, dependent on the underlying strata. Local health and building jurisdictions issue the well licenses and place the minimal standards for well production, which can vary from 1 to 5 gallons per minute or longer.

Shallow Well Pumps

Pumps mounted on the surface draw water from the well using a drawing activity. A pump of the kind only works with wells which are 25 feet deep or less. These types of pumps usually also want a booster or a holding tank to increase the water delivery from the Boston AC repair specialists lines, measured by pounds per square inch. The pump sends the water to the cylinder where it’s stored for use.

Jet Pumps

Jet pumps come in two choices, shallow well or deep well. Both pump types sit above the ground Cape Coral. The shallow well jet pumps draw water from one line situated in wells no deeper than the usual maximum of 25 feet deep. Deep well jet pumps utilize two lines, one for pulling the water, and you also for forcing the water into the delivery system. Deep well jet pumps can pump water from wells which vary from 25 to 110 feet deep.

Deep Well Pumps

Deep well pumps — measured by horsepower and gallons per minute delivery — install within the well from 25 to 400 feet deep. The pump is submerged deep in the well, well below the static water level, but not at the base of the well. Usually installed with a pressure cylinder beside the pump, the pump does not cycle on until the tank drops below a particular level. The pressure or holding tank sits a couple of feet from the well head. A pressure regulator installed inline after the cylinder controls the water pressure in the lines and the flow to the cylinder. It shuts off the pump when the tank is full. Three-wire pumps utilize a control unit above the ground Fresno, making them easier to mend.

how-to-remove-a-mandrel-from-a-42-inch-craftsman-lawn-tractor-599a59916333e.jpg

How to Remove a Mandrel from a 42 Inch Craftsman Lawn Tractor

When you’ve got a problem with the mandrel, also referred to as the spindle, on your Craftsman 42-inch lawn in San Diego tractor, chances are it shows itself by preventing the blades from spinning or by creating a noticeably uneven cut. Since the blades attach to and spin around the mandrel, the only way to restore the blades to working order is to remove the mandrel and repair it or replace it with a new one.

Park the yard tractor on a level surface and set the parking brake to stop the mower from moving. Remove the key from the ignition to stop it from accidentally beginning. Set the parking brake and adjust the PTO lever, located on the ideal rear fender, to the “Off” position.

Set the deck lift lever, located on the right-rear fender, to the bottom position. Eliminate the belt-keeper pole by removing the screw that holds it in place so that you are able to get the PTO pulley. Take note of which hole that the pole was inserted to so that you may put it in the exact same position following the mend. Pull the belt from across the PTO pulley.

Eliminate the bow-tie pins that attach the lift linkages into the mower deck. Look for a single lift and pin linkage on each side of the mower. Eliminate the bow-tie pins that attach the front and back of the mower deck to the front and back mounting brackets. Detach the deck from the brackets afterward.

Eliminate the bow-tie pin from the back of the mower’s deck in which it attaches to the PTO cable. Disconnect the spring from the deck idler bracket to complete the detachment of the mower deck from the tractor. Roll the mower deck from beneath the tractor.

Turn the mower deck upside down and place it on the grass (Long Beach, CA) or on a sheet or blanket to prevent scraping the paint. Insert a hardwood block between the blade and the mower deck housing. Remove the nut that attaches the mower blade into the damaged spindle with the appropriate wrench. Lay the nut and blade aside.

Remove the four nuts that attach the mandrel assembly into the mower deck with the appropriate socket. Permit the mandrel assembly to drop from the surface of the mower deck on the ground Phoenix. The mandrel is now completely removed from the machine.

the-way-to-change-the-engine-drive-belt-in-a-troy-bilt-model-77-599a649a8cbe7.jpg

The way to Change the Engine Drive Belt in a Troy-Bilt Model 77

When the motor drive belts in your Troy-Bilt Model 77 mower provide out, the only means to get it running again would be to replace them with fresh ones. Replacing the belts in this two-belt system requires you to dismantle and reassemble several parts of the mower so as to remove the old straps and install the new ones. By staying organized as you work and ensuring that you have the correct tools and instructions, you will be able to efficiently replace both belts on your mower.

Park the mower on a flat surface and remove the key from the ignition. This prevents accidental starting of the machine during the repair.

Fix the deck lift lever, found on the ideal fender, to the bottom position. Use the appropriate socket to remove nuts which hold the belt guard set up. Pull the belt guard from the machine and disconnect the mower deck belt from the pulley beneath the back of the machine.

Use a pair of needle-nose pliers to remove the two back pins that attach the deck lift linkage into the mower deck. Pull the elevator linkage away from the deck. Remove the pin which holds the front deck lift linkage into the mower and pull the elevator linkage away from the deck. Pull the pin that attaches the PTO cable into the mower deck with the needle-nose pliers, and pull the PTO cable loose from its housing. The cable is still connected to the deck with a huge spring. Grasp the spring and twist it to remove it from the deck. Now that the deck is completely detached from the mower, then roll it out from underneath the machine and place it aside.

Lift the battery cover in the back of the machine to get the mower’s battery. Use two wrenches, one in each hand, to remove the negative battery cable from the battery’s terminal. Hold the bolt stable with one wrench while you twist the washer free from the finish. Repeat this procedure to remove the positive battery cable.

Press on one end of this bar that is over the battery and holds it in place to take out the bar. Lift the battery from the machine and place it aside. Remove the two battery support bars which sit beneath the battery by pulling the ends of these from the slots to which they’re inserted.

Tie a piece of cord around the end of the idler spring which you can see protruding underneath the battery compartment. Bend the ends of the string together to form a loop. Pull firmly on the string to dislodge the end of the idler spring and remove it from the mower.

Insert a screwdriver to the head of the bolt which holds the transmission pulley set up. Hold the screwdriver firm and take out the transmission pulley nut by turning it with a wrench in precisely the same time. Pull the pulley from the spindle on which it sits and disconnect the top motor belt from the pulley.

Find the belt which runs from the mower’s engine and wraps around a pulley in the back of the machine. Hold the pulley’s spindle in place with a pipe wrench and remove the nut underneath the pulley with the appropriate socket connected to the socket. Pull the pulley from the machine. The belt will remain attached to this variable speed disc. Lift the center section of this pulley up and get rid of the belt.

Install the lower drive belt which runs from the engine to the transmission by wrapping it about the variable speed disc. Lift up the center section of this pulley again as you did when you removed the old one to install the new one. Slot both sides of the belt between the pulley and the guides that hold it in place. Reattach the engine pulley into the machine and secure it in place by reinstalling the middle nut. Wrap the belt around the engine pulley and add it between the spindle and the guides.

Wrap the top belt around the transmission pulley. Match the tooth of the pulley and the hub together with each other before tightening the nut that attaches the two. Wrap the belt around the top section of this variable speed pulley and about the idler pulley. Reattach 1 end of the idler spring into the frame of the mower. Wrap the cord you used previously around the opposite end of the spring, pull it across the hole from where you removed it earlier, and pull hard to reinsert the spring to the hole. Remove the cord when completed.

Reinstall the battery service bars which sit beneath the battery by inserting the protrusions at either end into the slots in the battery compartment. Place the battery back into the compartment under the service bars. Reinstall the pub over the battery which holds it in place. Reattach the positive battery cable to the positive battery terminal and bolt it in place. Repeat the procedure with the negative battery cable. Close the battery compartment cable.

Slide the mower deck back underneath the mower. Reattach the spring in the conclusion of this PTO cable into the mower’s deck. Pull the cable through the manual to make certain that it’s properly set up and reinsert the pin which holds it into the machine. Reconnect the lift linkage into the mower and add the pin which secures it. Repeat this procedure with the two back lift linkages.

ryobi-bc30-adjustments-599a3e2aa5030.jpg

Ryobi BC30 Adjustments

The Ryobi BC30 is a 30cc trimmer with numerous headsets for cutting Lawn Service and powering through light brush. As is the case of any Agreement, the BC30 requires periodic service, nevertheless, the only adjustments that could be produced by the user to boost functionality would be to the carburetor. Be aware that the string blade or head attachment will bend while setting the carburetor rate, so keep the head a safe distance away from legs along with other people in the vicinity to prevent injury.

Adjusting the Carburetor Speed

In case your Ryobi BC30 begins and accelerates properly but won’t stay running at idle speed, the carburetor rate has to be raised. Do this by rotating the idle speed screw, situated on the front side of the carburetor housing, clockwise with a screwdriver while the unit is operating. Fix the screw until the engine maintains a constant idle. If you can’t keep the unit running to set the idle speed, then turn the idle speed screw clockwise about one-eighth of a turn with the unit turned away. Then start the motor and adjust the idle speed to the desired setting. If the unit is idling too fast, turn the screw counterclockwise to slow it down.

characteristic-attributes-of-china-rose-599a3e28752ec.jpg

Characteristic Attributes of China Rose

China rose is just another name for Chinese hibiscus (Hibiscus rosa-sinensis), a botanical name which translates literally as rose of China. A tropical Stump Removal which grows in U.S. Department of Agriculture plant hardiness zones 9 through 11, China rose can be treated as an annual in cooler climates. It’s best known for its big, vibrant flowers Long Beach.

Stately Shrub

China rose hibiscus is a perennial tree Long Beach Tree Removal and can develop anywhere from 4 to 15 feet tall and 5 to 10 feet wide, though it may take several years for a shrub to reach maximum size. When treated as an annual, the Stump Removal will remain much smaller. Hibiscus can be implanted separately as a specimen or in rows to form hedges. China rose may also be trained as a standard, or little tree form, by removing all but one vertical stem and trimming the lower leaves as the plant grows. The plant will grow and bloom best in full sunlight, with at least six hours of direct sunlight each day.

Flower Features

The 4- to 6-inch diameter tropical blooms are the main attraction of China rose plants, and are favorites for hummingbirds and butterflies. The flowers can cover the whole plant once it gets enough sunlight and tons of water. Each flower only lasts for a day or 2, but the plant continually creates flowers. China rose’s standard blooms are generally medium to dark red. Dozens of cultivars widen the range of color choices, including purple, orange, yellow and white. Flower shape varies slightly among cultivars, but they generally feature five round-tipped petals around a dark-colored center. The petals are slender and slightly crinkly, often resembling wrinkled tissue paper. Some cultivars like “High Definition” and “Silver Medal,” both grown in USDA zones 9 through 11, have big, double blooms.

Lovely Leaves

While certainly no competition for China rose’s dynamic blooms, the shiny green leaves are attractive even when the plant isn’t in bloom. The leaves are generally rounded or heart-shaped having a slight point in the tip. The advantages of the leaves might be serrated or scalloped, depending on the cultivar. Without pruning, branches tend to grow vertically without much secondary branching. If the tips are pinched back in spring and midsummer, you can attain a full, rounded bush. After the crops mature and are educated to the desired shape, continue trimming the tips at spring and midsummer. Remove about one-third of the older wood on adult China roses each spring to replenish the plant and stimulate new development. Sterilize pruning tool blades by wiping them away with alcohol prior to trimming. This prevents diseases being passed to healthy crops through infected blades. If you visit aphids, mealybugs or spider mites about the plant, then spray them off with a strong flow of water from your hose.

Blooming Period

China rose plants may create beautiful blooms throughout summer when given proper care. The flower buds develop on new growth, so pruning of the advice in spring and midsummer ensures ample flowers during the season. Unlike many flowering plants, deadheading isn’t necessary for ongoing blossom production since the previous blooms fall off the plant on their own. Flower production might decline in times of drought, therefore water that the hibiscus frequently to maintain the soil fairly moist but not soaking wet. If the soil or plant remain too wet, China climbed might have issues with respiratory diseases. Proper watering can generally prevent these issues. It is possible to increase plant growth and flower production using a monthly application of a general-purpose fertilizer during the growing season from April to September. When using a frequent all-purpose, water-soluble fertilizer, like 24-8-16, by way of example, dissolve 1 tbsp of granules in 1 gallon of water. Apply the fertilizer to the ground around the plant as part of the normal watering schedule, utilizing 1/2 gallon for smaller plants and a full gallon for bigger plants.